

The problem: confusing bike setup measurements
You want to restore your saddle after maintenance, but your old note contains only a number. You cannot remember where the tape started. Perhaps you measured along the seat tube, while now measuring directly to the saddle nose. The difference looks like a fitting problem, but could come from your method.
The same thing happens when comparing two bikes. Saddle to bar distance looks equal, yet your hands sit further away. Or a new saddle has the same height but supports you in a different place. A list of numbers alone cannot explain that.
This guide helps you build a complete, repeatable record. You learn which measurements answer different questions and which components to record alongside them. You can then track a change, reverse it or discuss it with a fitter. A measurement sheet does not prove that every number suits your body.
Background: reference points give numbers meaning
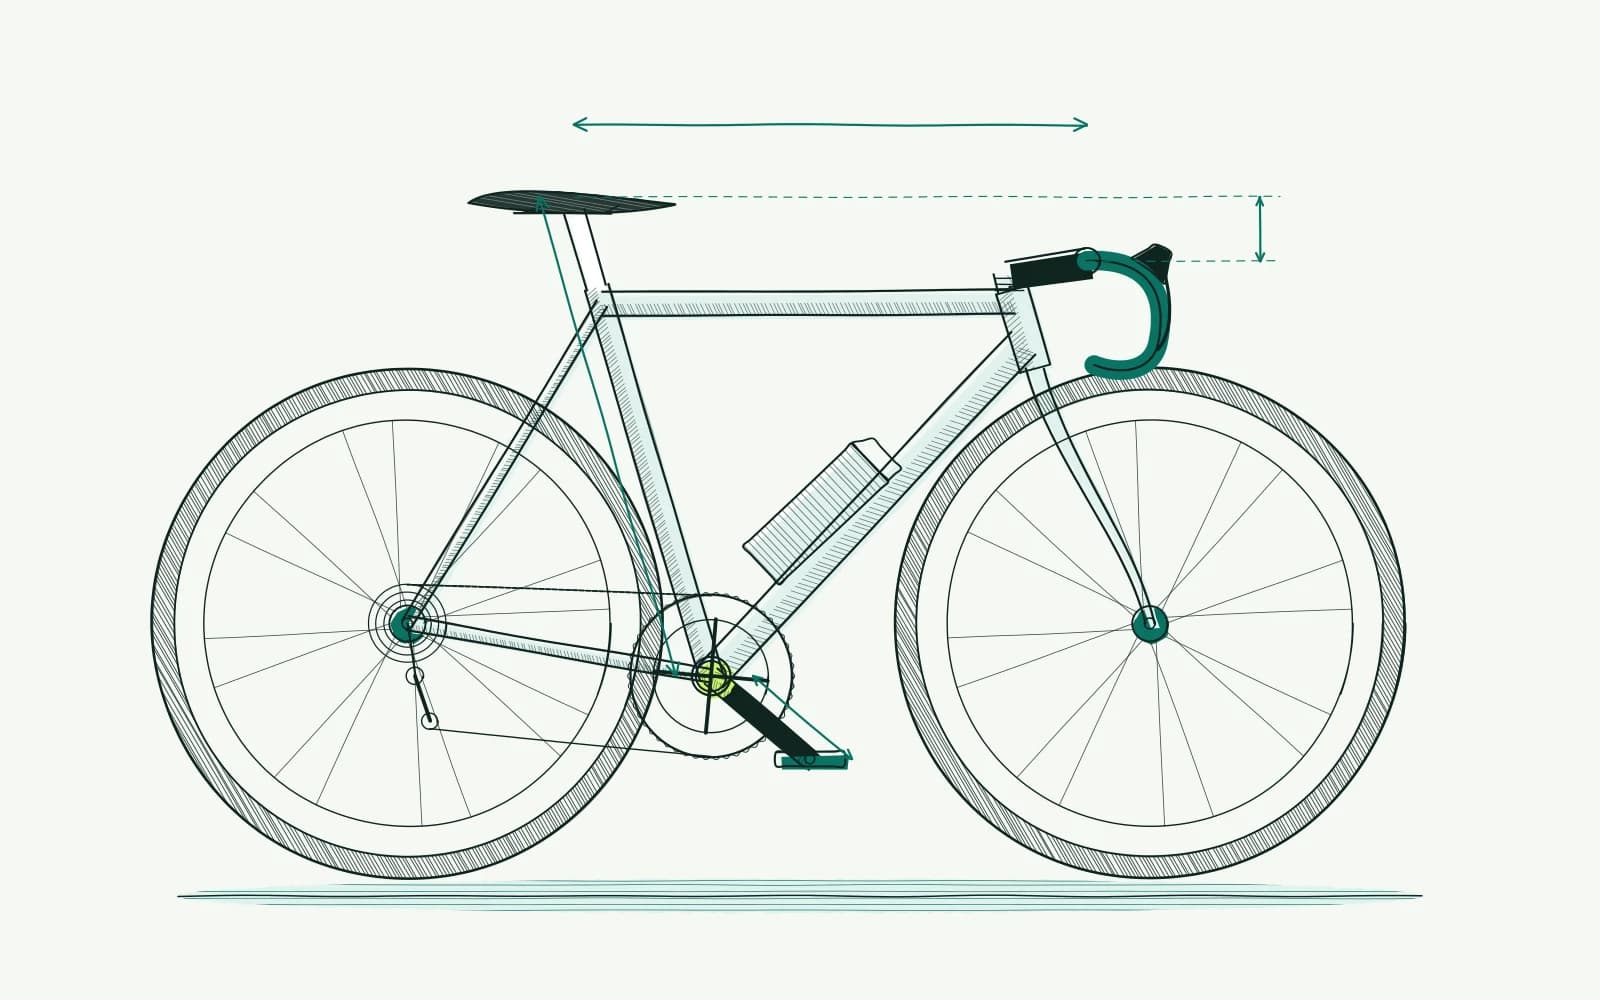
Saddle height describes the distance between the bottom bracket centre and a chosen point on the saddle surface. Record which point you use and how you hold the tape. A different saddle shape can change that point. Compare the measuring method and component as well as the result.
Saddle setback is a horizontal distance relative to the bottom bracket. You might choose the saddle nose as an identifiable reference and record that choice. A shorter saddle nose changes this measurement without necessarily making the same change to your seating location. Saddle tilt describes something else: the angle of your chosen measuring surface.
For the handlebars, height and distance are separate questions. Drop describes the vertical difference between saddle and bars. Reach to the hood describes where your hand rests. A distance to the bar centre does not fully record hand position because bar shape and hoods also matter.
Frame reach and stack belong to frame geometry. They do not directly describe the distance from your saddle to your hands. The stem, spacers and bar add their own dimensions. Keep frame specifications separate from your measured contact points.
Crank length runs from the bottom bracket centre to the pedal axle centre. Record shoes, pedals and cleats too. These details identify which components were present during measurement. A component change can be a reason to measure and compare again.
A calculator can offer direction, but cannot check your reference points. A small difference between measurements may be measuring variation. First establish whether the difference is repeatable before moving components.
How to approach it with bike fitting
-
Create a consistent measuring setup: Stand the bike upright on a level surface. Use a tape measure, spirit level and plumb line; ask someone to keep the bike steady. Record the date, bike, saddle model and shoes and pedals used.
Take a side photograph with visible measuring points. Repeat a measurement without copying your first number. If the results differ noticeably, improve your setup first.
-
Record the saddle: Measure from the bottom bracket centre to your chosen point on the saddle. Record the distance in millimetres. For setback, measure horizontally between vertical lines through the bottom bracket centre and saddle reference.
For tilt, place a straight edge on a described part of the saddle. Record the measured angle and the surface used. A curved or dished saddle needs extra care when choosing that surface.
-
Describe where your hands rest: Measure saddle height and bar height from the same floor. Their difference gives drop, provided you use clear reference points. Also record the distance to an identifiable point on the hood.
State whether you measured that distance diagonally or horizontally. Keep stem length, bar model and hood position with the measurement. Your notes then remain useful when comparing components later.
-
Connect one question to one change: Use the bike fit calculator to compare body measurements with your current position. Do not move anything simply because a recommendation differs. First describe the practical issue you want to investigate.
If investigating a potentially high saddle, lowering it by 2–5 mm could be a cautious trial. This example is not a treatment for pain. Record old and new measurements; leave tilt and setback otherwise unchanged.
-
Check installation and compare rides: Respect manufacturer clamping zones, minimum insertion and torque settings. Have uncertain installation checked by a mechanic. Then test two to three easy rides while symptom-free, with comparable routes and effort.
Record control access and comfort alongside measurements. Stop for new symptoms or reduced control and restore the safe baseline. A smaller number is not an improvement if riding becomes worse.
-
Stop when measuring is not enough: Pain at rest, night pain, swelling or radiating tingling need medical assessment. Do not keep adjusting then. Have pain persisting after three to four careful adjustments assessed by a fitter and, where appropriate, a clinician.
Further reading
- Road bike fit: your three contact points connects individual measurements with support and control on the bike.
- Compare bikes for fit: contact points first helps you apply the same measuring method to two different bikes.
- Bike fit limited flexibility explains why a measured position also needs room for movement.
- Triathlon bike fit: support in aero helps explain the additional support points provided by aerobars.
- The bike fit calculator provides a starting point for comparing body measurements with your existing setup.
Frequently asked questions
Which units should I use on my measurement sheet?
Use millimetres for distances and degrees for angles, with the unit beside each number. Record the reference point rather than just adding decimal places. Repeatability makes your notes useful. A precise-looking number offers little help if you later forget which points you measured between.
Should I record the left and right sides separately?
Record components positioned separately on each side, such as cleats and hoods. Describe a visible difference before trying to remove it. A difference does not prove a physical problem. Seek help if you cannot establish whether it comes from installation, measuring method or posture.
Can a photograph replace my measurement sheet?
A photograph helps identify components and reference points, but perspective affects distances in the image. Use actual measurements for your numbers. Keep the photograph as an explanation and take repeat photographs from the same direction. A photograph alone cannot check whether bolts are secure either.
When should I create a new version of my measurements?
Create a new version after a deliberate adjustment or component change and keep the previous one. Add your reason and observations. You can then distinguish maintenance from an adjustment trial later. For unexpected movement, check the attachment first before continuing to ride the bike.
This guide covers one part of your riding position. Read how bike fitting connects your measurements and bike setup.
Create your measurement sheet and compare your current position with a calculated starting point.
Calculate your bike fit